New Simple Task for beginner IBM Maximo Developer.
Situation : There is 4 type of identity or parameter used in Service Request Maximo Developer. That is:
1) People - Is the whole people in the organization including people that are not using the system.
2) User - Is the person or people that is using the system and have access to the IBM Maximo.
3) Person Group - Is the Group of people in that organization, for example IT department.
4) Security Group. - This is the group that define for user to only have access to their certain needs. For example In IT department, User can only have access to their template and not other department template.
Let say, a user report a problem "Desktop problem" via a mobile phone to 'Company XYZ'. Once the user report the problem using Maximo, The 'Company Help-desk' will get the report from user and then try to solve the problem. If the Help-desk cannot solve the problem, he will key in the detail of the problem into IBM Maximo system, which will be pass to 'Technical Support Team(TST)' of Company XYZ. The TST now will trying to solve the problem. If he is successfully solve the problem, he will write a 'Solution detail' for future reference. If anything same problem happen, they don't have to waste time by troubleshoot the problem again, and just have to refer the solution in the pass.
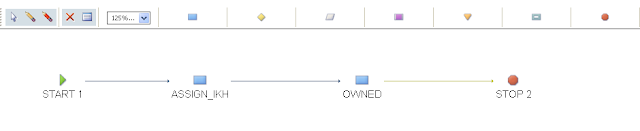
Now, we need to create vary basic and normal program that usually use in System Support environment.The workflow is show as the following.
What will happen is that, when User report a problem, there is 3 person involve in this tutorial,
1) User - User will report a problem.
2) Helpdesk - Helpdesk will receive an assignmet from the user.
3) Admin - To develop workflow for both of them.
Follow this step to do a Workflow :
-------------------------------
1) Now helpdesk login to his system and see that he have no assignment yet.
2) Login as Admin to do a workflow,
Navigate to "Go to" > System Configuration > Platform Configuration > Workflow Designer
3) Click on the "New" icon to create a new workflow.
by default you should see canvas page as the following :
4) Drag Icon Called "Task Node" into the workflow designer.
5) Drag positive icon from START 1 icon, to TASK 3 icon, TASK 3 icons to TASK 4 icon, TASK 4 icon to STOP 2 icon.
6) Type in Process Name, Object, and description. Then click on the "SAVE" icon.
Process name can be any name, Object is SR means Service Request. Just put any description that might relevant to your process flow as the following:
Now we have to set up a person, user, and person group. We will get back to this workflow section once the person, user and person group is complete.
1) Now login as Admin, and navigate to 'Go to' > Administration > Resources > People.
2) Fill in all the required information in the fields provided.
3) Click on the save button, and 1 people have been created.
4) Now, we have to create new user, as you still login as Admin, navigate to 'Go to' > Security > User.
5) Navigate to User tab.
6) Clik on 'New' icon or press CTRL+ALT+I on your keyboard as shown below:
7) Type in 'UserName' using the people name we just created above. In this example i type "ABU". Then the system will automatically capture the data from ABU profile.
8) Click on 'Password' button:
9) Key in the password, and UN-thick both of the check box, then click on 'OK' button.
8) Click on 'Save' button or press CTRL+ALT+S on your keyboard as shown below:
9) After the user has been created, now we need to create a person group. In this case, let say all the problem will be escalated to the Technical Support. In the Technical Support there is more than one person. But i only create one person only, that is ABU. You can create more person if you want. This is just to show you, if the problem is escalated to Technical Support team, all the people inside the group will see an assignment in their 'Start Center' Page.
Now, we create Person Group called TST i.e Technical Support Team.
Navigate to "Go to" > Administration > Resources > Persons Groups.
10) Click on the 'New' icon or press CTRL+ALT+I to create new Person Group.
11) Type in the person group Name and description:
12) Add people into this group. Click on the 'New Row' button at the right corner of the people fields.
13) Type in Person Name we have just created, in this case is ABU, then press TAB key. The system will automatically fill up the information from the database. After that, Type 1 as the sequence.
14) After that, click on the 'SAVE' icon at the top or press CTRL+ALT+S to save.
As you can see, i have add 1 more person called 'IKHTIAR' in this group. Repeat the step 12 to 14 if you want to create a new person inside this group. Now when the user escalate the problem to technical support team, both of this user can see the assignment in their "Start Center" page.
15) Now, since we already have 2 person, 1 group, and we can proceed to our workflow.
We need to search back our workflow that we have created.
Navigate to 'Go to' > System Configuration > Platform Configuration > Workflow Designer >
and type in the workflow Name/ Process Name for the workflow in the process field and press 'ENTER'. In this case 'IKHTIAR2' is my process flow Name.
Now, the process flow link will appear underneath the filter fields as shown below. Now click on the process flow link.
16) Double Click on the first anchor that connect Start icon and TASK 3. Action properties window will appear. Than click on an 'Arrow' icon beside the action text field.
17) Click on "Go to Action" link.
18) Click on the 'New Action' icons.
We have to set the TST(Technical Support Team) as owner group once the report is submitted.
On the Action tab, fill in all the required fields. Set Type to => Set Value. Type in 'TST' at the Value field. At Parameter/Attribute fields type in OWNERGROUP as shown below. Then click on the "SAVE" icon.
19) After that click on "Return with value" link at the top right corner of the screen as shown below:
20) Now we have to set the Status to 'Queue' first. Again, click on an 'Arrow' icon beside the action text field.
21) Click on "Go to Action".
22) Click on "Create New Action" icon at the middle of the screen.
23) Fill in all the required fields. Change the type to "Change Status". Click an "Arrow" icon beside the Value text fields.
24) Select Value fields will appear. Click on the Queue link.
25) Click on "SAVE" icon, then click on "Return with Value" link.
26) In order for both action will be executed, we need to combine this 2 action together as a group. Now click on an 'Arrow' icon beside the action text field. Then, click on the 'Go to Action' link.
27) Fill all the required fields, Select the type as Action Group from the Type drop down menu. Click on "Select Members" button as shown below:
28) "Select Members" window will appear. Click on the "Filter" link to search for our action that we have created just now. Type "Set" at the action text fields and press "Enter".
29) Tick on the 'Set_OWNERGROUP' check box, then click on OK button.
30) "SET_TSTOWNGRP" action will appear underneath the Members section. Notice that the sequence is 10. Click on 'Select Members' button again to add Queue into this group and set it to sequence 20.
This means that, SET_TSTOWNGRP will be execute first than only the QUEUE status will be in action.
31) Then, click on "Return with value" link and click OK at the Action Properties.
32) Then, click on the "SAVE" icons or press CTRL+ALT+S to save the workflow.
33) We are done with the "Anchor" from Start icon to the TASK 3 action properties. Now, we proceed to the next icon. That is, TASK 3. We need to change the title of the TASK 3 so that we can understand the workflow very well.
Henceforth, double click on the TASK 3 icons,
34) Type in the title on the title field, and the relevant description on the description text fields. Set the 'Application' field to SR, and untick at the "Display One?" check box. After that, click on "OK" button.
Thats it for Task 3.
35) Now we can proceed to the "Arrow" that connected from "Assign_TST" to TASK 4. Double click on that arrow.
We have to set the status as owned status. This mean, if on of the person group member accept that ticket, the status for the ticket will set to OWNED status instead of QUEUE. The status for person group will change to the status of person.
36) Type in "OWN" on the action text fields and then press "Enter" button.
37) Click on "OWNED" link.
38) Fill in all the required fields, set the Obejct to SR, set the type to "Set Value", Type in the "Value" to :user, type in the "Parameter/Attribute" to owner. Then click on "Return with value" link.
in this case, :user means system will capture the current user that are click on the ticket and get the status Owned.
39) Now, we have to set the "Change Status" from QUEUE to OWNED. Click at the "Go to Action" link again. Then, click on the "New Action" icon or press CTRL+ALT+I to create new action.
40) Now, Fill in all the required fields, Set Object to SR, Change the Type to "Change Status". Click at the arrow beside "Value" text fields and search for OWNED, then click on "Save" icon. After that click on "Return with value" link at the top right corner of the page.
41) Hence, we have to group this 2 action together. Now, click on Arrow and click on "Go to Action" again.
42) Then fill all the required fields, and put the object as SR, Change the type to "Action Group". Then click on the "Select Members" button,
43) On the "Select Members" screen, click on "Filter" to search and type in "OWN" and press "Enter". The result will be appear underneath the member search fields. Now, tick on the "OWNED" fields, then click on "OK" button.
44) Now add another action group "CHANGESTATTOOWNED" into action group. Click "Save" first, then click on "Select Members" button. On Members Screen, Click on "Filter" link, then type in "change" and press "Enter". After that tick on "CHANGESTATT" check box and click "OK" button.
45) Then, click on "Save" button and notice that 2 action has been add together in this "Arrow". Then click on "Return with value" link.
46) On Action properties window, click on "OK" Button.
47) Now, don't forget to save. Click on the "Save" icon to save the workflow.
48) Now we are done setting up the action Arrow pointing from "ASSIGN_TST" to TASK 4. Now we need to set the Title inside TASK 4 to OWNED. That mean, The user now have the status Owned.
49) On the Task Node Properties screen, type in OWNED and relevant description on the on the title fields. Set SR to the application field. Then untick "Display One?" check box. Then click on "OK" Button.
Click on the "Save" button on the workflow designer page. We will get back to this page as soon as we finish create a Role ID to be assign.
50) Now we have to set the "Role" in the OWNED task node in order to assign a person to the ticket.
Navigate to "Go to" > System Configuration > Platform Configuration > Roles.
51) Click on the "New Role" icons or press CTRL+ALT+I to create a new Role.
52) On the "Role" screen, fill in all the required fields.In this case i type RECIEVETIC as the role ID. Set type to "A set of data related to the record". Set obejct as SR. Type in "Owner" at the value text field.
53) Now, navigate to workflow designer again to setting up the Roles for Owned Task Node.
Navigate to "Go to" > System Configuration > Platform Configuration > Workflow Designer
54) Type in "Ikhtiar2" in the process text field and press Enter. Click on the process link, In this case is IKHTIAR2.
55) Double click on the OWNED task node.
56) On the Task Node Properties screen, click on "New Row" button.
57) On the Assignment section, At the Role ID field, click on the "Arrow" beside the Role ID text field and click "Go to Roles" link.
58) Type in the name of the Roles that we have create just now. In this case, type in "RECIEVETIC" at the Roles text field and press Enter.
59) Click on the "RECEIVETIC" link.
60) Click the "Save" icon, then click on the "Return with value" link.
61) On the Assignment Section, Set "SR" to the application text fields. Then write a relevant description. After that click on "OK" button.
62) Now, click on "Save" icon to save the whole workflow.
If you have any question or advice regarding this tutorial, please submit your comment below.
Thank you,
Regards,
Ikhtiaruddin.


4 responses to Tutorial 2 - New Simple Task for beginner IBM Maximo Developer
Hi,
Thanks for this great Tutorial.
In my workflow i would like to route a Service request to different assignee/groups based on the classifications. I have 4 levels of classifications (300+ in total), and i would like to map the service requests among 5 groups.
What would the better approach i can implement??
Tekslate.com is the Industry leader in providing IBM Tivoli Training across the globe. Our online training methodology focus on hands on experience of IBM Tivoli.
To Attend Free Demo (Or) For any Queries Write to us at:
Email: info@tekslate.com
USA :- +1 415-830-3823, India :- 91 954-262-2288
Website: http://tekslate.com/
URL: http://tekslate.com/ibm-tivoli-training/
My business partners were needing 2013 NY DTF IT-2104 several days ago and discovered a great service with a ton of fillable forms . If people need 2013 NY DTF IT-2104 too , here's a link http://pdf.ac/2X3cUz
Hi. My question is, don't you have to register a role in task "ASSIGN_TST"?
Post a Comment